

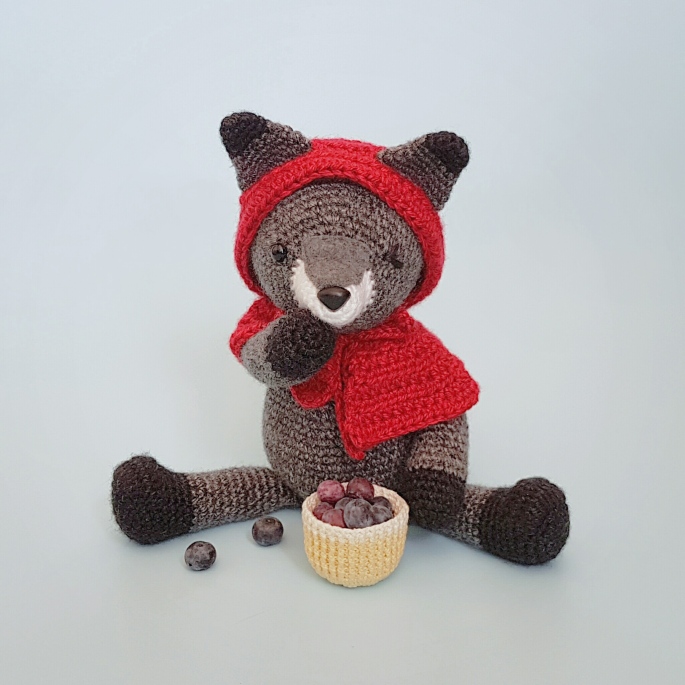
Who’s afraid of the big bad wolf? I can’t imagine anyone would be afraid of Willa with her little smirk and adorable hooded poncho all tied up in a nice, sweet bow!
PS. Like my free patterns? I recently wrote a children’s book, All the Ways You’re Important to Me, that contains 10 adorable crochet patterns in the back. I’d love for you to take a peek!
Some notes before we get started!
Materials:
- Small amounts of worsted-weight yarn (I used Lion Brand Heartland) of your choice in:
- Gray
- Black
- Red
- White
- US F/3.75mm crochet hook
- 1 safety eye (9mm diameter)
- Small amount of worsted-weight yarn or embroidery floss
- 1 safety animal nose (18mm)
- Small amount of gray felt
- Gray thread
- Tapestry needle
- Sewing needle
- Fiberfill for stuffing
Skill Level: Intermediate
Size: Approximately 10.5 inches from toes to ears and 3 inches across the widest part of her middle.
Pattern Notes: Unless otherwise specified, this pattern is worked using the amigurumi method. Rounds are worked in a continuous spiral. No need to slip stitch at the end of a round and chain one before beginning the next one. To keep track of where I’m at in the pattern, I use a brightly colored paperclip as a stitch marker in the first stitch of each round. Also note that while gauge isn’t particularly important when working up amigurumis, I do tend to be a tight crocheter, so I usually have to start with a slightly larger hook than patterns call for. If you have a loose or standard gauge and your stitches look too loose with the F hook, simply size down your hook until the stitches look nice and tight for you!
Construction: Body is worked first, followed by head, ears, arms, legs and tail, which are then sewed together. Cape is made separately and tied to body.
Abbreviations (US terms):
- ch: chain
- sl st: slip stitch
- sc: single crochet
- hdc: half double crochet
- dc: double crochet
- dc2tog: double crochet next 2 stitches together
- BLO: back loop only
- FLO: front loop only
- inc: single crochet increase (2 single crochet stitches into the same stitch)
- dec: single crochet decrease (crochet 2 crochet stitches together)
- st: stitch(es)
- [number]: indicates number of stitches in each round or row
Pattern
Body
With gray yarn
Round 1: 6 sc in magic ring [6]
Round 2: inc in each st around [12]
Round 3: (inc, sc in next st) around [18]
Round 4: (inc, sc in next 2 st) around [24]
Round 5: (inc, sc in next 3 st) around [30]
Round 6: (inc, sc in next 4 st) around [36]
Round 7: (inc, sc in next 5 st) around [42]
Round 8: (inc, sc in next 6 st) around [48]
Round 9: (inc, sc in next 7 st) around [54]
Rounds 10-18 (9 rows): sc in each st around [54]
Round 19: (dec, sc in next 16 st) around [51]
Round 20: sc in each st around [51]
Round 21: (dec, sc in next 15 st) around [48]
Round 22: sc in each st around [48]
Round 23: (dec, sc in next 6 st) around [42]
Round 24: sc in each st around [42]
Round 25: (dec, sc in next 5 st) around [36]
Round 26: sc in each st around [36]
Round 27: (dec, sc in next 4 st) around [30]
Round 28: sc in each st around [30]
Round 29: (dec, sc in next 3 st) around [24]
Stuff body. Continue stuffing as you go.
Round 30: (dec, sc in next 2 st) around [18]
Round 31: (dec, sc in next st) around [12]
Round 32: dec around [6]
Finish off. Stitch top hole closed and weave in ends.
Head
With white yarn (starting at snout)
Round 1: 6 sc in magic ring [6]
Round 2: inc in each st around [12]
Round 3: (inc, sc in next 3 st) around [15]
Rounds 4-5: sc in each st around [15]
Round 6: (inc, sc in next 4 st) around [18]
Rounds 7-8: sc in each st around [18]
Round 9: (inc, sc in next 2 st) around [24]
Change to gray yarn.
Round 10: sc in each st around [24]
Round 11: In FLO (inc, sc in next 3 st) around [30]
Round 12: (inc, sc in next 4 st) around [36]
Round 13: (inc, sc in next 5 st) around [42]
Round 14: sc in next 14 st, (inc, sc in next 6 st) twice, inc, sc in next 13 st [45]
Round 15: sc in next 14 st, (inc, sc in next 7 st) twice, inc, sc in next 14 st [48]
Round 16: sc in next 14 st, (inc, sc in next 8 st) twice, inc, sc in next 15 st [51]
Round 17: sc in next 14 st, (inc, sc in next 9 st) twice, inc, sc in next 16 st [54]
Rounds 18-25 (8 rows): sc in each st around [54]
Round 26: (dec, sc in next 7 st) around [48]
Place safety eye between Rounds 12 and 13, embroider winking eye approximately 13 st apart. Cut a small amount of gray felt in a rounded triangle and sew over top of snout. Place animal nose at tip of snout. Embroider smirk at side of mouth, if desired.
Round 27: (dec, sc in next 6 st) around [42]
Round 28: (dec, sc in next 5 st) around [36]
Round 29: (dec, sc in next 4 st) around [30]
Round 30: (dec, sc in next 3 st) around [24]
Round 31: (dec, sc in next 2 st) around [18]
Stuff head. Continue stuffing as you go.
Round 32: (dec, sc in next st) around [12]
Round 33: dec around [6]
Finish off. Stitch top hole closed and leave long tail for sewing head to body.
Ears (make 2)
With black yarn
Round 1: 6 sc in magic ring [6]
Round 2: (inc, sc in next st) around [9]
Round 3: sc in each st around [9]
Round 4: (inc, sc in next 2 st) around [12]
Change to gray yarn.
Round 5: sc in each st around [12]
Round 6: (inc, sc in next 5 st) twice [14]
Round 7: (inc, sc in next 6 st) twice [16]
Round 8: (inc, sc in next 7 st) twice [18]
Round 9: (inc, sc in next 8 st) twice [20]
Round 10: sc in each st around [20]
Finish off. Do not stuff, fold ear flat and sew closed, leaving a long tail for sewing ear to body.
Arms (make 2)
With black yarn
Round 1: 6 sc in magic ring [6]
Round 2: inc in each st around [12]
Round 3: (inc, sc in next st) around [18]
Rounds 4-6 (3 rows): sc in each st around [18]
Change to gray yarn.
Rounds 7-8: sc in each st around [18]
Round 9: (dec, sc in next 4 st) around [15]
Rounds 10-14 (5 rows): sc in each st around [15]
Round 15: (dec, sc in next 3 st) around [12]
Begin stuffing arm. Continue stuffing as you go.
Rounds 16-24 (9 rows): sc in each st around [12]
Finish off. Pinch tops of arm flat and sew closed, leaving a long tail for sewing arm to body.
Legs (make 2)
With black yarn
Round 1: 6 sc in magic ring [6]
Round 2: inc in each st around [12]
Round 3: (inc, sc in next st) around [18]
Round 4: (inc, sc in next 2 st) around [24]
Round 5: sc in next 9 st, hdc, 2 dc in each of next 6 st, hdc, sc in next 7 st [30 (16 sc + 2 hdc + 12 dc)]
Round 6: sc in next 9 st, hdc, dc2tog 6 times, hdc, sc in next 7 st [24 (16 sc + 2 hdc + 6 dc2tog)]
Round 7: (dec, sc in next 2 st) around [18]
Rounds 8-10 (3 rows): sc in each st around [18]
Change to gray yarn.
Round 11: sc in each st around [18]
Round 12: (dec, sc in next 4 st) around [15]
Rounds 13-21 (9 rows): sc in each st around [15]
Round 22: (dec, sc in next 3 st) around [12]
Begin stuffing leg. Continue stuffing as you go.
Rounds 23-24: sc in each st around [12]
Finish off. Pinch tops of leg flat and sew closed, leaving a long tail for sewing leg to body.
Tail
With white yarn
Round 1: 4 sc in magic ring [4]
Round 2: (inc, sc in next st) twice [6]
Round 3: (inc, sc in next 2 st) twice [8]
Round 4: (inc, sc in next 3 st) twice [10]
Round 5: sc in each st around [10]
Round 6: (inc, sc in next 4 st) twice [12]
Round 7: (inc, sc in next st) around [18]
Round 8: sc in each st around [18]
Change to gray yarn
Rounds 9-13 (5 rounds): sc in each st around [18]
Begin stuffing tail. Continue stuffing as you go.
Round 14: (dec, sc in next 7 st) twice [16]
Round 15: sc in each st around [16]
Round 16: (dec, sc in next 6 st) twice [14]
Round 17: sc in each st around [14]
Round 18: (dec, sc in next 5 st) around [12]
Rounds 19-20: sc in each st around [12]
Finish off and leave a long tail for sewing tail to body.
Cape
With red yarn, ch 25
Row 1: hdc in 3rd ch from hook and in each st across, ch 1, turn [24]
Row 2: (2 hdc in next st, hdc in next 3 st) 6 times, ch 1, turn [30]
Row 3: (2 hdc in next st, hdc in next 4 st) 6 times, ch 1, turn [36]
Row 4: (2 hdc in next st, hdc in next 5 st) 6 times, ch 1, turn [42]
Row 5: (2 hdc in next st, hdc in next 6 st) 6 times, ch 1, turn [48]
Row 6: (2 hdc in next st, hdc in next 7 st) 6 times, ch 1, turn [54]
Row 7: (2 hdc in next st, hdc in next 8 st) 6 times, ch 1, turn [60]
Row 8: (2 hdc in next st, hdc in next 9 st) 6 times, ch 1, turn [66]
Row 9: (2 hdc in next st, hdc in next 10 st) 6 times. Finish off and weave in ends. [72]
Hood
With red yarn
Round 1: hdc 6 in magic ring, sl st to 1st st, ch 1, turn [6]
Round 2: 2 hdc in each st around, sl st to 1st st, ch 1, turn [12]
Round 3: (2 hdc in next st, hdc in next st) around, sl st to 1st st, ch 1, turn [18]
Round 4: (2 hdc in next st, hdc in next 2 st) around, sl st to 1st st, ch 1, turn [24]
Round 5: (2 hdc in next st, hdc in next 3 st) around, sl st to 1st st, ch 1, turn [30]
Round 6: (2 hdc in next st, hdc in next 4 st) around, sl st to 1st st, ch 1, turn [36]
Round 7: (2 hdc in next st, hdc in next 5 st) around, sl st to 1st st, ch 1, turn [42]
Round 8: (2 hdc in next st, hdc in next 6 st) around, sl st to 1st st, ch 1, turn [48]
Round 9: (2 hdc in next st, hdc in next 7 st) around, sl st to 1st st, ch 1, turn [54]
Round 10: hdc in each st around, sl st to 1st st, ch 1, turn [54]
Round 11: hdc in next 18 st, ch 7, skip next 7 st, hdc in next 5 st, ch 7, skip next 7 st, hdc in next 17 st, sl st to 1st st, ch 1, turn [54]
Rounds 12-14: hdc in each st around, sl st to 1st st, ch 1, turn. [54]
After completing Round 14, finish off and weave in ends. Lay edge of hood, centered, across top edge of cape. With red yarn, sew together starting at 6th st from edge of cape, stopping once you have 5 st left on opposite end of cape. To make ties, insert hook in top corner of cape, ch 35, finish off and weave in ends. Repeat on opposite side of cape.
Making Up:
Sew ears to head between Rounds 20-22 approximately 6 stitches apart. Sew head to body. Sew arms to body just under neck. Sew legs to underside of body, making an approximate 90 degree angle so the legs will splay and she can sit up on her own. Sew tail into place centered on body between Rounds 9-11. Stick Willa’s ears through the holes on the hood and tie the cape in place. Your sassy girl is all set!
I would love to see your finished work! Tag me on Instagram (@handcraftingalife) or share in the comments below!
Wiley Willa the Wolf is provided free by Cassandra Rendon with the intention of adding a little fun to the tail end of this winter season. Please feel free to make and give away or sell any amigurumis made from this pattern, but please keep in mind that copying this pattern for your own commercial use is not allowed (plus it’s just kind of a jerk move). For additional information, please contact Cassandra Rendon on her blog (wordpress.com/handcraftingalife) or on Etsy (etsy.com/shop/lascosaschiquitas).

2 thoughts on “Wiley Willa the Wolf – Amigurumi Pattern”